

There are many talented and writing enthusiasts who want to take their idea and show it to the entire world. They want to start a blog but do not have the idea or struggle to start one. Today we are going to see how we can setup a WordPress blog in under 30 minutes.
Prerequsites
Before we start any project, there are set of prerequisite which needs to be completed before initiation of the project. Ex: If we plan to build a small room, we would require basic construction materials such as sand, cement, bricks, water and tools. Even if any one of the item is missing, we would not be able start constructing the room.
Likewise, to setup a wordpress blog we would require domain name and website hosting. Most of us would have heard these terms domain name in casual talk. So let us first understand domain name.
What is domain name?
A domain name in general parlance is called a website name or website address. It is also called URL [Universal Resource Locator]. As most of us know, computers can communicate only in numbers, and the domain name points to a set of numbers that is used to view the website. Some of the popular domain names or websites are google.com, apple.com, cnn.com etc.
For example, techchandru.com domain name will be assigned a number that is used by the computer networks to fetch the webpage and display it to you. Fetching of the webpage happens in milliseconds, that we would not even know that many things are happening once we type the website address and hit enter in the browser.

If humans are made to remember or refer to a set of numbers to visit any website, it would become difficult to navigate through the world of the internet. Hence to overcome this challenge, domain names were introduced where we enter the website address in the English language, and behind the scenes, they are converted into numbers and the website is displayed to us.
The concept of the domain name is a technical subject where it involves, IP Address, Domain Name System which I will explain in a different blog.
How to get a domain name?
A Domain name can be purchased from a domain name registrar.
Domain Name Registrar are companies that help us to register a domain name for a fee. There are various domain name registrars in the market where we can purchase our domain name.
Each domain name registrar charges a varying fee to register the domain name. It is best to compare a few domain name registrars before making the purchase. Also do check the renewal fees since most registrars offer low registration fees for the first year and during renewal, the renewal cost is substantially higher than the initial registration cost.
A few of the recommended domain name registrar are dom,ain.com, name.com, namecheap.com, and google domains.
Worlds first 20 domain name with registration date:
| Domain name | Registration date |
|---|---|
| symbolics.com | 15/03/1985 |
| bbn.com | 24/04/1985 |
| think.com | 24/05/1985 |
| mcc.com | 11/07/1985 |
| dec.com | 30/09/1985 |
| northrop.com | 07/11/1985 |
| xerox.com | 09/01/1986 |
| sri.com | 17/01/1986 |
| hp.com | 03/03/1986 |
| bellcore.com | 05/03/1986 |
| ibm.com | 19/03/1986 |
| sun.com | 19/03/1986 |
| intel.com | 25/03/1986 |
| ti.com | 25/03/1986 |
| att.com | 25/04/1986 |
| gmr.com | 08/05/1986 |
| tek.com | 08/05/1986 |
| fmc.com | 10/07/1986 |
| ub.com | 10/07/1986 |
| bell-atl.com | 05/08/1986 |
Website Hosting
What is website hosting?
Website hosting or web hosting is a type of service used to host your website and its files on a server.
Website hosting servers are computer servers loaded with software such as Linux or Windows Server OS and hosting applications which help to host your website.

How to purchase a hosting service?
Similar to domain name registrar, there are many web hosting companies that provide hosting services.
There are different types of hosting services provided by hosting companies. Some of the hosting services that are provided are
- Shared Web Hosting
- Virtual Private Server
- Dedicated Server
- Cloud Hosting
To start with, Shared web hosting should be sufficient for beginners as they tend to have low traffic. The hosting company should also provide with one-click WordPress installation along with cPanel which helps to setup a wordpress blog quickly.
As the website grows and there are lots of traffic coming to your website, the hosting type should be upgraded to accommodate the traffic so that your site does not crash or break down due to low server capacity.
I would recommend hostinger for shared hosting as they provide a very affordable plan and their customer service is also good. You can setup a WordPress blog quickly using hostinger hpanel. Namecheap is also another budget-friendly hosting company.
Neil Patel also recommends hostinger for web hosting and he has provided a detailed review of the hosting service.

Other web hosting companies such as WPX, A2, bluehost can also be given a thought if you do not have any budget constraints.
Now that we have purchased domain name and webhosting, it is time to setup a wordpress blog.
In this next section, we will see in detail how we can setup a wordpress blog from scratch.
Setup a wordpress blog
Before we learn how to setup a WordPress blog, let us understand what is a blog.
A blog or weblog is a collection of posts or articles that are written targeting a specific niche that is setup for personal use or business needs.
A typical website will have a static homepage where the information that is setup as part of the homepage is created once and remains static and does not get updated often.
Whereas Blog page is updated with posts or articles at regular intervals. Updating the blog at regular frequency helps the blog to be kept in good standing with respect to google algorithm.
We now have our custom domain name and web hosting, it is time to setup your wordpress blog.
I will show you with step by step instructions on how you can setup a wordpress blog in less 10 minutes.
Login to your web hosting portal with your registered username and password. I use hostinger.in for hosting my techchandru.com site and you should log in to your own web hosting portal where you have purchased your hosting plan.
Please note, hostinger has its own proprietary cPanel like software called hPanel which has all the functions as in cPanel.
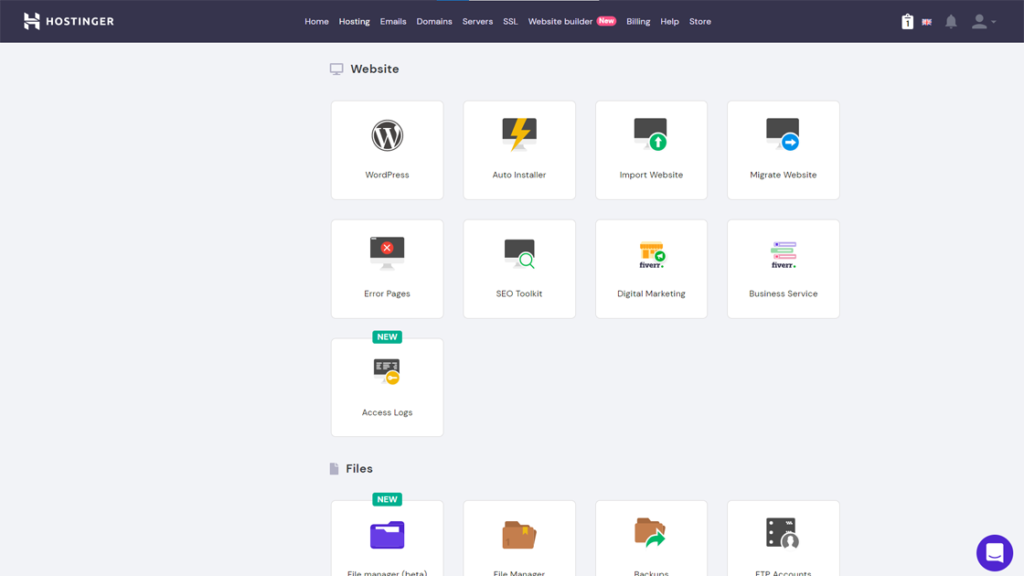
Step 1: Once logged into your hostinger dashboard, click Hosting at the top and you can view your domain name. Click “Manage” to open the hPanel dashboard which lists various options which can be used for setting up the website.

Step 2: Scroll down to the bottom where it says “Website”. Under “Website”, Click on WordPress.
Step 3: The following page will list options to “Detect WordPress” or “Install WordPress“. Click “Install WordPress” to initiate WordPress installation.

Step 4: A pop-up window will be displayed with options to install WordPress. Make sure to enter all the required details and click “Install“.
Note: Do not enter any value in “Subcategory”. When a value is entered in Subcategory, it creates a folder with the same name and all the installation files will be loaded under that folder.
Ex: Let us say you have entered “hello” in Subcategory, the website can be accessed using the following website address iamchandru.com/hello and not iamchandru.com causing confusion among your users.
Since this is a fresh installation, the check box can be checked or unchecked and will not have any impact. Incase you would want to reinstall WordPress with start over again, the checkbox can be kept checked.
When the default option “Create New Database” is selected, it will create a database name by itself and assign it to this installation.
If you want to have a customized database name, you can create a database before starting the WordPress installation and select it from the drop-down list to assign to this WordPress installation.
This will come in handy if you have multiple WordPress installations under a single hosting plan as this will help you name the database as per your choice. The optional step to create a customized database is provided at the bottom for reference.

Step 5: WordPress installation is successfully installed and will be redirected to the website dashboard for other options which can be tweaked as per our choice. Let us check if we are able to access the website using the website address iamchandru.com.

Step 6: The website address is correctly displaying the homepage with the default WordPress theme. Now you have successfully installed the WordPress site and the final step is to setup the WordPress blog.
I can understand that the setup looks very easy and simple and also the homepage does not have many great elements which you usually see in well-established websites. You can also create a great looking website once you start configuring the pages and other elements within WordPress dashboard.
For setting up the WordPress blog, you need to login to the WordPress dashboard and that can be done via the “Edit Website” button displayed at the top right in Step 5 or follow the instructions sent via email from you hosting company.
Another simple method to log in is via the standard WordPress login URL: domainname.com/wp-admin

Step 7: Below is the default WordPress dashboard for the newly installed WordPress site. You can change default theme and other options using the settings provided in the dashboard.

Step 8: You can add a blog post from the WordPress dashboard by navigating to “Posts>Add New“. The stage is set now for you to blog and you can start blogging on your favorite topic or on your niche.

I will write a separate blog on how to update the settings and other options available in the WordPress dashboard which itself is a detailed topic.
Happy Blogging!
Optional Step
The below database creation step can be performed before WordPress installation in Step 4.

cPanel WordPress installation
To know how to install a WordPress blog using cPanel, you can follow the blog post from digital deepak where he has detailed setting up a wordpress blog using cPanel.
Conclusion
I hope you were able to understand how to setup a WordPress blog in under 30 minutes. If you already purchased a domain name and hosting plan, setting up a WordPress site will not take more than 10 minutes.
If you were able to follow the instructions and liked them, please comment your thoughts below.

I have got my domain name.I will now have to choose a hosting plan.
Thank you for explaining this so well.
Thanks Nita for your feedback!